|
|||
|
|
|||
|
 |
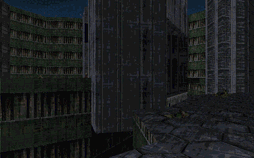
The screen shot to the left shows the bridge as seen from the position on the map. You can see the entrance to the bridge on the right of the column, and the gap below the bridge where the sewage flows underneath. A team of Nar engineers (on leave from measuring the universe to the nearest inch by means of a giant iron chain) has drained the river for the occasion. |
|
 |
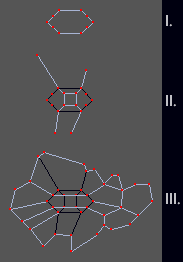
Step I. Draw the column as shown. I've included points around the column for the passage through the column that will become the 'bridge', and the polygon that will be beneath it, but you can put them in as you go. Step II. Next draw the lines shown. These will become the 'bridge' when we set the floor and ceiling elevations later. These polygons will attach opposite 'banks' of the river so the player can run across. Don't bother filling in the polygons yet, there a are a few tricks involved, so let's do it later. Step III. Finally, add the two lines that run through the column from East to West. These lines CAN NOT share any points with the lines drawn in Step II because they need to form distinct polygons. Later when you create polygons out of this mess, use these two overlapping passages to create the "bridge". I've added the rest of the lines that make up the river for good measure. |
 |
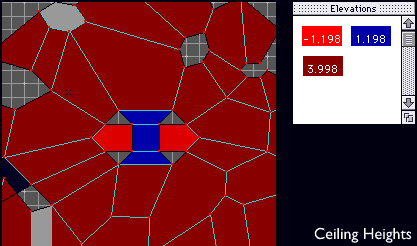
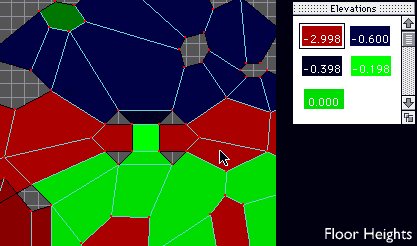
Now take a minute to fill in the polygons. In Forge, when you fill a polygon, Forge takes the point that you click on and goes horizontally left until it hits a line. When it hits this line, it follows it in a clockwise direction. The tricky part is that Forge goes from one point to the next down lines until it arrives back where it started. If it doesn't arrive back where it started or there isn't a concave polygon in the area that you clicked, then it does nothing. If it arrives back at the place it started this clockwise checking, then it fills the polygon. In our example, try clicking in the middle right section of the column. You'll notice that there are convex spaces in the column that we DON'T want to fill. If these areas are filled, you'll break the Marathon engine because you'll break one of the fundamental rules: you'll see into two overlapping spaces. Grendel took pictures of the floor and ceiling heights. You can see that the ceiling of the underside of the bridge(bright red) is lower than the floor of the bridge(black, bright and brighter green). To really make the whole thing look nice, we've added textures and lighting that bring out the details of our geometry - the textures under the bridge are darker as are the inside walls of the bridge. |
|
 |
||
If you want to make a cool bridge, but Grendel hasn't explained it well enough, bother him with email. |
||