| First thing to do is turn off the "snap
to grid" from the Map Manager. Then select the grid length
to World Unit. Now, start drawing lines. Hold down the option
key to constrain the line length to the current grid setting(in
this case 1 W.U.). |
|
 |
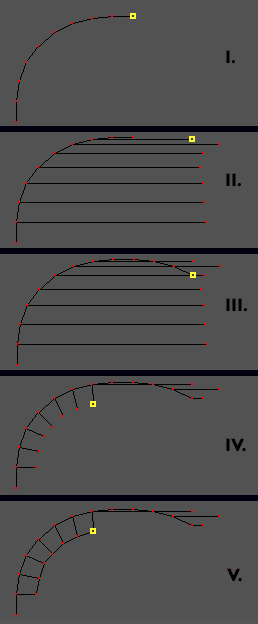
I. To start making curvy walls, draw
constrained lines one after the next. Each time, increase the
angle of the line a teeny bit. To change the radius of the curve
you're making increase or decrease the angle of the line. |
|
| II. Ok, so you're wondering where
the trick is right? Now draw some guidelines. Take the first
few points you've placed, and draw lines either horizontally
or vertically from these. In our example we've used horizontal
lines, which means that we'll extend the curvy wall around to
the right. |
|
| III. Use the Guidelines to continue
the curve. Keep drawing constrained lines from the last one you
added, and simply have the point end on the guideline. This way,
you can make the curve symetrical. |
|
| IV. We've deleted the guidelines from
our example and started adding lines that will later form the
facing side of stairs. Again, we're making these lines a constrained
size, this way we can have the inside of the stairs match the
outside curve. You have to draw these new lines so they bisect
the angle between the two lines on the outside of the curve.
(Note that we did a very poor job of bisecting the lines in our
example.) |
|
| V. Now draw the inside of the the
stairs by connecting each of the lines we just drew. Of course
here you don't want to constrain the size of the lines, just
make them as long as they need be to complete each stair. |
|


