|
|||
|
|
|||
|
| Parts List for the Basic Multi-Stop |
|---|
Refer to the parts list above for what you will need, to make the most Basic Multi-Stop that will be shown to you here.
What makes this all work? The Multi-Stop elevators all have one thing in common, they have a Control Platform (CP). This CP moves a certain distance, starting and stopping the central main platform that the player stands and rides on. All is controlled with this CP. That's what makes this work.
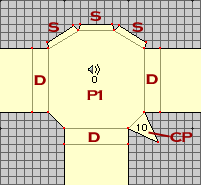 |
Following this plan here, we setup the polygons.
The key for this (and all following diagrams): |
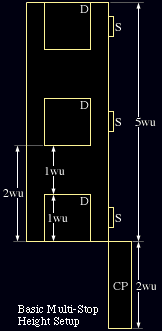 The Diagram to the right shows
all the heights in a more visual sense as to how all the polygons
heights are arranged. Keep in mind this is only a diagram, and
you cannot put a door above a door on the same side of a polygon
(same goes with those switches).
Each Doorway and each Switch are on different levels, thus being an elevator. For this example,
The switches get situated one for each level, at a nice height to where they are in the players direct sight.
Now, the P platform gets a floor height of 0.00 and a ceiling of 5.00 (you can make the ceiling 6.00 for aesthetic looks if you wish). The CP gets a floor of -2.00 (yes, negative), and a ceiling of 0.00. The reason you do this, is so the CP is never seen. If it is below the base floor height of the main elevator and doors, the player will never see this CP and never know it is there (which is good).
Texture up everything as you would like. Then afterwards, make the LINE that borders between the P and CP, NON-Transparent and SOLID. This will change the color of the line in Draw View. This is done so that when in Infinity, you will not see this CP at all.
Now that we
have all the polygons setup nicely with all the right floor and
ceiling heights, we get into the more nasty bit of this demonstration.
Grendel hates this bit, yes.
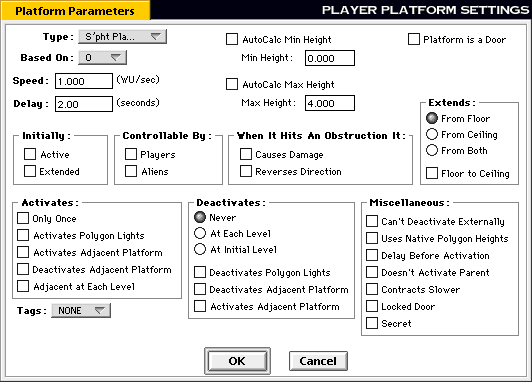
The above dialog is from Forge. This
is how you should fill out your main P platform. Follow this exactly!
Once you learn how to do these, and understand why what is checked
and how, then you will be permitted to run amuck and do your own
wild ideas. But until then, stick to the basics.
The Type can be anything you like, this is the sound the platform will make when it is active. This example has it set to Noisy Platform.
Notice the start and stop heights... the high point of this platform is the floor height of the top most doorway. You do not want it to go higher, unless you conceive of some hideous plan to kill the player with a massive crushing... but Hastur hates that.
The reason why this platform is set to Never deactivate, is because that's the Control Platform's job. All this will soon become more clear to you by the end of this explanation.
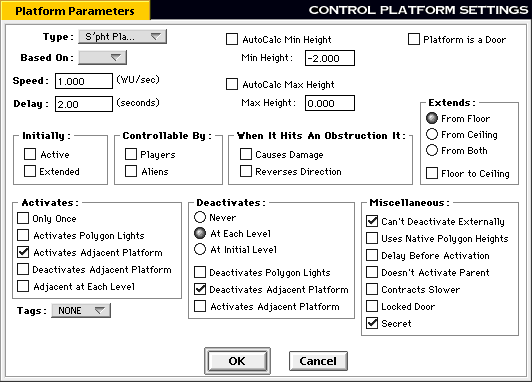
The
above now is for the Control Platform. This platform controls
everything. You link all the switches to this platform for activation,
and then this platform does the rest for you. It is imperative
you mark everything exact like shown above.
How & Why:
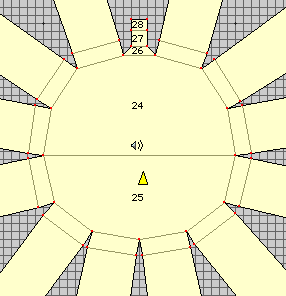 Grendel has a
warning to share.
The diagram to the left is of a monstrous Multi-Stop elevator. You can download it to see. But there are some odd problems that one will come across. The common most annoying problem occurs when you make large ammounts of stops. The Basic Multi-Stop only had three stops, so the error (even though visible) did not pose a problem at all in the long run.
Grendel has calculated a 0.00416wu error in the distance the platform reacts to stop, from where you actually want it to stop. This causes the edge of the elevator floor to not line up exactly with the doorway floors. When you have a lot of doorways, this causes Great Headache later on.
In this monster example, Grendel off-calculated the top ending height of the platform to be slightly less than where it theoretically would have landed without the error. Having 12 stops, the error came to around -0.05, so Grendel took OFF that ammount to all the max heights of the platforms, except the CP (the CP never changes from it's heights). Doing this allowed the whole elevator array to reset itself when the player reached the bottom. This is good, because if the elevator does not reset itself, the error will grow every cycle.
All of that must really seem confusing, but once one gets to learn the Basic Multi-Stop, then one will further grasp the large scale ability that the monster example shows. Also, once you start experimenting for yourselves, you will come across this slight annoyance. Just remember, each stop loses or gains 0.00416wu (depending on what attitude Forge is in at the time, for the monster example, it was comming short. The basic example had it overshooting).
Floating switches (first introduced in Ne Cede Malis, and further utilized in Marathon:EVIL), makes this elevator much easier to control, and also looks real bitchin too boot. The Floating Switch is used in the monster example. Since the Floating Switch takes a bit more to explain, it's in a second section.