
|
|||
|
| Adding Textures to a Texture Set |
|
Although many of the tutorials at the Battle Cat's Marathon Page dance around it, there is no actual direct, step-by-step tutorial addressing the task of adding new custom textures to an existing texture set collection. Until now that is. Quartz wants you to know he did not invent this technique, he is merely passing it along to you after picking it up from others along the way. The scope of this tutorial does not include creating the new textures themselves. |
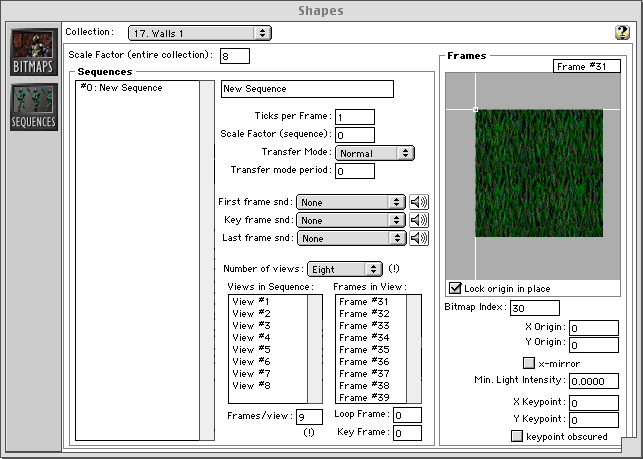
(Shown above is the Sequences window of Hakvil)
| First of all, download Hakvil
and run the patch on Anvil. This tutorial refers only to Hakvil, other
versions of Anvil will only bring you grief and pain.
To add a single texture to a texture set -
To add up to 9 textures to a texture set - Use the steps above repeating step 4 until you have added all 9 textures. When you get to step 5, change the "Frame/view" value to the number of bitmaps you have added, in this case 9 (that is the max). Click on "View #1" in the "Views in Sequence" box and the number of frames you specified will appear in the "Frames in View" box. Click on each frame # and add the corresponding "Bitmap Index" to the right. To make even more textures: Change the "Number of views" drop box to 8, and change the "Frame/view" text box to 9. You will have created room for 72 new textures. 8x9=72. Get it? If for some reason you're insane and need more than 72 new slots, add another couple sequences. Beware though if you decrease the "Frames/view" number while the "Number of views" is greater than one, you will introduce a frame numbering bug that will corrupt your collection. Always work from a backup of your shapes file. Notes: WORK ON A BACKUP COPY OF YOUR SHAPES FILE! You do not have to create your bitmaps first, you can create your sequences first. I always max out the number of views/frames before I start adding any bitmaps... having a lot of spare frames lying around doesn't hurt anything, and it saves you the bother of having to add them later if you need it. As a personal preference, when viewing frames in the 'sequences' pane, I usually turn off "Lock origin in place" so I can see the bitmap. There's a "count from 0 Vs count from 1" issue here - each frame index # should be 1 greater than the bitmap # it references. This isn't technically required (you could make them match), but any of Aleph One's on-the-fly changes (like animated textures) will assume that they're off by 1. Although this is obvious, it's worth saying - normal Marathon (not Aleph) and Forge will crash if you try to view a map that uses textures that aren't in the current shapes file, so make sure that if you have several shapes files floating around Marathon/Forge is set to use the right one. One of these days I'm going to see if any of the other fields in the 'sequence' pane do anything (like X and Y origin and x-mirror) |
| Please feel free to email Quartz to ask him questions about what you read here. Also be my guest and pester the hell out of him for more contributions to Anvil Tips. This guy is very knowledgeable in things Marathon and if it takes putting him on the rack to pry this out of him then, I have the lumber, anyone have some rope? |
![]()
![]()