|
|||
|
| M2/Mi Clut Notes |
| I was wandering through the Hamish Halls of Horror the other day and as I paused before the jar of napalm that preserves the remains of Hamish Sanderson's exploded head, I noticed a line in the wall behind the showcase. There was a glimmer of a light from behind the crack so I pried at it with my combat knife. To my surprise, a secret panel opened and a document fell out! It was a missing tutorial on CLUTs by the man himself! I immediately translated it from its native Scottish gibberish (minus the profuse swearing, odes to whiskey, and lengthy apocalyptic prophesies) and have added it to my collection of Hamish's rantings for those seekers of Anvil Truth. - gls |
|
I have assembled the following for your pleasure and delectation the
full M2/Mi color table in Photoshop3.0 CLUT format (I believe
newer versions of PS should have no problems with this though), and
a PICT of said CLUT for reference. [Editors Note: you can download the
materials mentioned in this tutorial at Fileball.net
or use the exact replicas presented here- gls 01/28/2002]
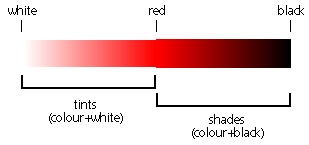
The PICT [and GIF above, just drag it off the browser
window] is supplied so you can eyedropper colors out of it directly,
if you like working that way when drawing your art (remember kids, try
to draw with colors as close to the M-palette as possible if you want
it to index well). Or, if you prefer, PS can import the CLUT into the
Swatch palette directly (you do know what those little arrow
tabs with the pull-down menus in the top-right corner of the PS palettes
are for, don't you?). Please note that in both PICT and CLUT, I have supplied them to be (completely) Photoshop compatible - ie. The first entry is white and the last entry is black. To fit everything in, each ramp runs from its brightest color to its darkest color, but not to black. (FYI, the engine displays in a similar fashion when in 256 cols mode - a black appears at end of the first [white-black] ramp, but not at the ends of the others. Of course, the engine knows what it's doing...:) Remember that in Anvil all ramps must end in black for M2/MI to display correctly in 256 cols. This stuff is arranged specifically to best suit your PS indexing needs, not for importing into/out of Anvil. You can paste/import your PS artwork that uses my CLUT into Anvil no problem; but don't go trying to import the CLUT itself as it just won't work right. Refer to my EditNotes for further info and recommendations on working with Anvil and CLUTs.
I'm not going to mention much more here since all this takes me waaaay too much time to write, and anyway, a ''proper' artist should already know all this stuff and doesn't need me patronizing them (and 'non-proper' artists really need far more help than I could give them, short of writing an entire book - and you guys just ain't paying me enough to do that;). If you are feeling adventurous, however, you might want to check out
my original Marathon Art Guide, which I wrote way back in the intoxicating
days of High-TM1 Editing. I'm sure you'll be able to tell that just
from the prose if you do read it, however. You might get lucky though
and manage to extract just a little useful info from it though - the
stuff on making customized PS CLUTs to contain only one or two ramps
(ie. Only the colors you need to index a specific piece of art) is probably
the most useful tip there - this can be a useful technique in making
indexing colors more accurate. [You can also make custom CLUTs. with
only specific colors in by taking a copy of the full CLUT and editing
it in PS to delete all the entries you don't want, but that generally
takes longer to do in practice.] And, I don't care how often I say it, because no matter how repetitive I sound, if I don't then sure enough it's never long until you hear the next small and pathetic voice saying "I don't know how to do This, That or The Other in Anvil's Shapes editor; please tell me how." So: GO - AND - READ - MY - "EDITNOTES"! (a.k.a. "HAS' Editnotes" if you don't already know) These incorporate the Anvil Masterclass, notes on engine customizing, great advice by Randy Reddig on how to do good textures, and much, much more... Available from all good marathon archives (try a word search by name "EditNotes" to start with. Actually, do a word search by my name, and go check out some of the other cool toys I've released over the years:). They are, and I kid you not, vital reading if you do any kind
of Shapes work (and also some useful info regarding Sounds work too).
I've floated this stuff separately for now because there didn't seem
to be enough of it to warrant a new release of the EditNotes and it
was done by request, but I am acquiring some other new info to compile
into the EditNotes at some point, so watch that space, as they say... Good Luck, and keep those kickbacks coming! (Usual disclaimers reply; whatever it is, it ain't my fault. These notes, for what it's worth ©has99. |
Anvil Tips
| HAS Tutorials | Edit Notes | Sounds & Music | Images File
| Tools | Nonstandard Colors | Control Modifications
| HUD Modifications | Prefs Modifications | PICT Notes | Engine Hacking | Documentation
| Bandwidth Saving | Unused Sounds
| Hakvil | Shapes 1 | Shapes 2
| Color Clippings | Custom Icons |
Clut Notes
![]()
![]()