
|
|||
|
| Custom Icons and Unique Creator Code |
| Hamish Sanderson, when queried about the nonexistent "Custom Icons and Unique Creator Code section" in his Anvil tutorials said, "Sorry, that bit never got written." It could have been worse, God could have said the same thing concerning the last 3 of the 10 Commandments! Fortunately for us God found the time to jot down all the Commandments and much like Moses and God, Chris Komarnicki has collaborated with Hamish and together they have finally completed the long lost Custom Icon section. I guess this is more like Indiana Jones and the lost Ark actually, only with out all the arrows, snakes, flying wings and Nazis. Hmmm... actually I suppose it is more like just two computer geeks out-wonking one another. - gls |
|
Chris Komarnicki's Add-On to HAS' Unfinished Documentations on Custom Icons I emailed Hamish Sanderson about changing the icons for my scenario's game files. He gave me a wee bit more advice than what was available in his (unfortunately) unfinished EditNotes, under one condition: "that you write up the method in full (so it's easy for anyone to read and follow) when you've cracked it and submit it to Gary for his site...." Well, here goes... Custom Icons Intro To kick off this topic, I'd like to point out that truly customizing icons is more involved than just pasting an icon into the "Get Info" window. These can just as easily be cut out of the "Get Info" window, and are therefore not permanent. To properly customize an icon allows you to have permanent custom icons that are part of the Marathon application's code. It's actually not that hard to do (it only took me a few days or so to figure it out, and I ain't too particalerly bright...). What HAS said...This was what HAS had submitted in the EditNotes (found on another page about hacking the Mi engine): " - In ResEdit select "Get File/Folder Info..." from the "File" menu and navigate to the file you are changing. Change the creator code to your new one. Next in Fux! change the creator code for the Marathon engine by opening the appropriate Marathon application and select "File Types". Finally, create your new 1/4/8 bit icons and related masks in ResEdit. If folks want to do 32 bit icons in addition to those they will need additional icon design software as ResEdit doesn't do those. Also note that in Marathon Infinity v1.5 all the icon resources contains some additional icons (ID#s 1000-2000). These are used by the InputSprockets-based Controls Preferences, so should not be changed. - " The following 4 steps were based on something HAS emailed me personally, which has some slight discrepancies to the above "official" documentation (i.e. Steps 1 and 2 are reversed). I've added a few details and images to eliminate some confusion:
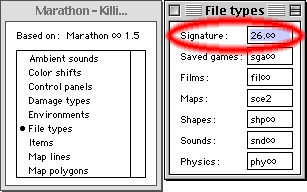
Step 1: With Fux!, open your Marathon application and go to "File types". Change the "Signature" ONLY. This field must contain 4 characters - no more, no less. Fux! won't allow it.
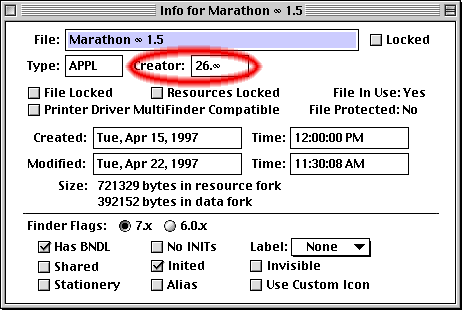
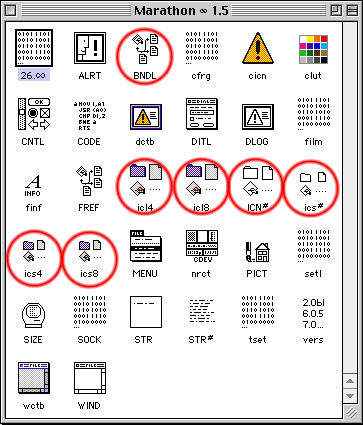
Step 2: With ResEdit, under the "File" dropmenu, select your Marathon application though the "Get File/Folder Info..." option, and change the "Creator" to the same 4 characters as Step 1. Step 3: Replace your application's icons. (Pretty vague - I'll get more into that soon, as well as changing the other game files' icons.) Step 4: Once you rebuild your desktop you should see the new icons. That about concludes HAS' email to me (plus a few of my own few words) on the topic. I'll start my bit now. Create Your New IconsFirst off, you'll need to create all the new icons you want to use. You could change the creator code and signature first, though either way will work. Here's the resource strings to look at. You can create your own icons directly in here, or else paste images in from applications like Photoshop:
* - When an icon in these strings is clicked, a dropfile menu appears allowing you to choose more colours: either the set Apple Icon 34, or the Standard 256. Look at the top of your screen for the "Color" dropmenu. (Note: Newer machines do not display the 1- or 4-bit icons.)
The strings have one feature that I don't think has been mentioned anywhere: If you open up an icon in, say, icl4, for example, to save time you can click on the other icons' ...icons... and edit them from there. As mentioned above, the BNDL string can do this, too. Lots of redundancy here. Note that there is also a "Mask" icon. Don't forget to change this if your new icons aren't the same shape as the original Marathon icon. Otherwise, part of your new icon will be clipped by the mask. Black denotes the clickable space. White areas are unclickable, and are also unseen ("masked"). At this point, your new icons should either have been created in or pasted into the application with ResEdit. Now we'll activate them so they show up. Hacking the Creator and SignatureNow is when you should follow Steps 1, 2, and 4 (waaay above). We'll move on to changing the rest of your game files' icons. All you need to do is select your Marathon files (Images, Shapes, Sounds, Map, Physics File, Music) though the "Get File/Folder Info..." option with ResEdit, and change their "Creator" to the same 4 characters as given to the application. These files' icons are changed in the Marathon application itself, and not within each file, so if you only change your application's signature before you rebuild your desktop (Step 4), that's okay. After your System is back on, these icons will pop up almost instantly when you change their creator name without needing to rebuild the desktop again. Custom Icons for Customized ToolsMy scenario hacked apart the Marathon application well
before I ever got around to changing the icons. To facilitate my scenario's
development, I had to hack apart Forge and Anvil (and a few other tools...).
Otherwise, remembering which new weapon, monster, item, or effect replaced
another would have been impossible.
The only thing you really need to watch out for is the
new "Creator" and "Signature" characters. If you
use the same ones as you did for your game application, you'll end up
with the same icon as your game application has. Give each application
a unique creator. |
![]()
![]()
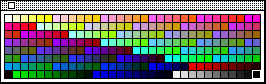 Remember
to assign your icons not created within ResEdit the proper CLUT before
pasting them in to the application. I couldn't find a way to export
the CLUT with ResEdit, so I took a snapshot of the screen with the CLUT
window open and cropped it. I then made an "Exact" CLUT from
that (via "Image/Mode/Indexed Color..." in Photoshop). Pasting
the 8-bit (256 colour) icon into the 4-bit icon's slot might work, though,
you'll probably want to touch it up in ResEdit.
Remember
to assign your icons not created within ResEdit the proper CLUT before
pasting them in to the application. I couldn't find a way to export
the CLUT with ResEdit, so I took a snapshot of the screen with the CLUT
window open and cropped it. I then made an "Exact" CLUT from
that (via "Image/Mode/Indexed Color..." in Photoshop). Pasting
the 8-bit (256 colour) icon into the 4-bit icon's slot might work, though,
you'll probably want to touch it up in ResEdit.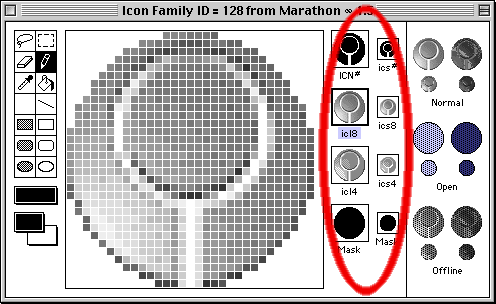
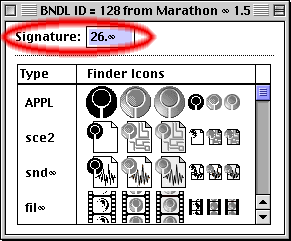 HAS
never touched on the BNDL string. Here is where the "Signature"
is changed through ResEdit. This is a string that gets changed with
Fux!, and since Fux! can't open any file other than the Marathon application,
you'll need to get here to change the icons for your Marathon tool applications.
HAS
never touched on the BNDL string. Here is where the "Signature"
is changed through ResEdit. This is a string that gets changed with
Fux!, and since Fux! can't open any file other than the Marathon application,
you'll need to get here to change the icons for your Marathon tool applications.