|
Texture Flexing
By Jason Harper, JasonHarper@pobox.com
From the Missed Island Map
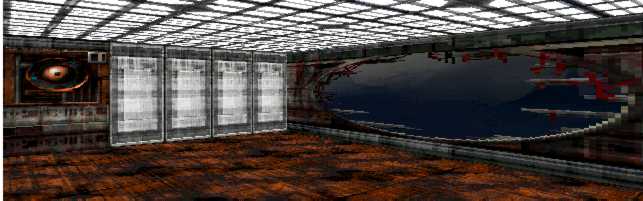
Did you notice anything unusual about this room? (Editor's Note:
The room Jason is referring to is the room from which the above
screen shot is taken. The graphic has been cropped at the top
to reduce the download size but has not otherwise been modified,
it is just as you would see it in Marathon. - gls)
Hint: there are NO custom textures involved. Everything you
see is an ordinary Marathon texture.
 Stretching or squeezing
the textures is accomplished by lying to Marathon about what
the actual lengths of the textured walls are. Wall lengths are
calculated once only, so that the game doesn't have to recalculate
this value each time a wall is displayed. In fact, one of the
optimizations performed by the map merging process is to precalculate
the lengths of all walls, so that the game doesn't have to do
this work when loading a level. However, if one of these precalculated
wall lengths is changed before playing the merged map, the game
will happily use the new length. For instance, a wall changed
to specify a length of 1 WU will display one complete repeat
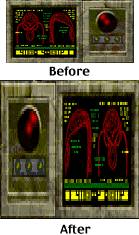
of its texture, regardless of the wall's actual length. Negative
lengths cause the texture to be mirror-imaged (notice the pattern
buffer). (Editors Note: refer to the graphic on the left - gls) Stretching or squeezing
the textures is accomplished by lying to Marathon about what
the actual lengths of the textured walls are. Wall lengths are
calculated once only, so that the game doesn't have to recalculate
this value each time a wall is displayed. In fact, one of the
optimizations performed by the map merging process is to precalculate
the lengths of all walls, so that the game doesn't have to do
this work when loading a level. However, if one of these precalculated
wall lengths is changed before playing the merged map, the game
will happily use the new length. For instance, a wall changed
to specify a length of 1 WU will display one complete repeat
of its texture, regardless of the wall's actual length. Negative
lengths cause the texture to be mirror-imaged (notice the pattern
buffer). (Editors Note: refer to the graphic on the left - gls)
Using this technique is currently a rather tedious process
involving a low-level file editor and a calculator that can work
with hexadecimal numbers. However, there's no inherent reason
why tools couldn't be developed to automate the process. I'm
NOT suggesting that people should go and stretch every single
texture on their levels, but I do believe that appropriate use
of this technique could add visual appeal to a level. In effect,
it gives you more texture variations to work with.
There are a few inherent limitations on texture stretching/squeezing:
- It only works with walls, not floors or ceilings.
- It only affects the width of textures, not their height.
- There is undoubtedly some limit to how long you can set a
wall's effective length to without messing up the display. I
haven't done any experiments yet to determine this limit, but
I'd guess that it's just under 32 WU. Of course, if you wanted
a wall with an effective length greater than the limit, you could
split the wall into multiple sections, all in a straight line.
- I suspect that this technique will only work reliably on
solid walls. If you tried to use it on walls that can be walked
over or under (such as a panel over a door, or the risers on
a staircase), Marathon may not be able to accurately determine
if the opening is wide enough to allow you or other creatures
to pass.
The technique has some additional limitations due to the fact
that it isn't integrated into the level design process. These
would go away if Bungie were to implement it as a new feature
in Forge...
- The wall length changes have to be applied to the merged
map file: editing the individual map levels accomplishes nothing.
- The changes have to be reapplied every time the map is merged.
Obviously this is something that you'd want to put off until
the map was otherwise finished.
- It's hard to align stretched textures properly since you
can't preview them in Forge. Basically, what you have to do is
position the left edge of each texture as desired. Changing
the wall's effective length will reposition only the right edge
of the texture.
If anybody wants to try this for themselves, here are the
gory details:
- In Forge, write down the line #, actual length, and desired
length of each wall that you want to stretch or squeeze. The
first two items can be determined by clicking on the wall.
- Open the merged map file in a file editor. I use a freeware
utility called HexEdit
(not to be confused with Hex!, the terminal editor).
- Search for the text "LINS", which marks the start
of the line-related map data. This will find the data for level
1: if you wish to edit walls on a higher level, you will need
to do a Find Next, (level - 1) times. Make a note of the file
position at which this text is found.
- For each wall to be edited, calculate a file position as
follows:
[position of "LINS" (hex)] + [line # (decimal) X 20
(hex)] + 16 (hex)
- As a safety check, make sure that the two-byte value starting
at the computed position matches the wall's actual length (multiply
the length in WU by 400 (hex) to convert).
- Change these two bytes to the desired value: again, multiply
by 400 (hex) to convert from WUs. Make sure you overwrite the bytes: if you insert them instead, you will destroy the map
file (of course, this is the merged version, so you can simply
merge again to regenerate it).
(Editors Note: Jason Harper has contacted me and would like
to inform you that since he has written this tutorial Chisel
has taken up the slack. In Jason's words, "The info in 'Texture
Flexing' is completely irrelevant now, since the Stretch effect
for Chisel can do the job with infinitely less
effort". I respectfully disagree with Jason, although it
would be much easier to use Chisel to perform Jason's technique,
knowing how it is done and who originated the idea is still vitally
important information. There are always those who like to get
their hands dirty as well as those who want to know how it is
done so they can make their own utilities. - gls 09/17/2000)
|