|
Big Floaty Things What Break The Rules
By Jason Harper, JasonHarper@pobox.com
The accompanying 5 maps illustrate an experimental technique
I've developed for producing more realistic geometry within the
limits of the Marathon engine, based on the creative use of untextured
walls. The maps can be viewed either in Infinity or Forge: Forge
would probably be a better idea, since you can more easily switch
between maps, and you can try making changes to the textures
and geometry in order to understand how the effects work.
This is a VERY advanced technique: it's probably not going to make any
sense to you unless you have a good grasp of what the engine's capabilities
are. I will assume that you're familiar with bridge-making and other
Marathon geometrical tricks, as explained in Hastur's
Workshop (Editor's Note: Hasturs Workshop is now available from
the Battle Cat's Marathon Page), and the 'how to' levels of my Missed
Island map (on the Trilogy maps CD). A good place to start would be
the Floating Cube map: if it isn't obvious to you that something strange
is going on here, you might as well quit now.
The basis of the untextured wall trick is the fact that the
Marathon engine isn't 100% efficient: in the process of generating
a frame of graphics, it may draw some surfaces, and then draw
other surfaces on top of them. This is normally not even detectable,
since the engine takes care to draw things in back-to-front order,
so you only see the surfaces that are closest to you, even if
more distant surfaces were uselessly drawn before them. However,
certain problems with the geometry of a level can confuse the
engine: you may have seen maps where, if you stand at exactly
the right place and look at exactly the right angle, you see
a distant corridor apparently in front of a nearby wall. It is
also possible to force the effect to appear, by having walls
that don't draw anything and therefore let more distant surfaces
appear where they normally wouldn't: this can be done either
by never assigning a texture to the wall at all, or by assigning
a transparent texture. The maps here all use the option of not
assigning any texture, since there is no completely transparent
texture in any of the standard texture sets (and a partially
transparent texture would ruin the effect). If you're using this
technique in a scenario that otherwise requires a shapes patch,
you may prefer to create a completely blank texture: this allows
you to use Forge's Pave command without wiping out untextured
walls. (Note that if you do accidentally assign a texture to
a wall, you can remove it by double-clicking on the line in Draw
mode, and checking the 'Empty' box.)
Floating Cube
This is about the most basic demo of the technique possible:
a square room, with a 1 WU cube floating in its center. Note
that you can see the far walls both above and below the cube,
which is not normally possible in the Marathon engine. The cube
is actually the bottom of a tall box, which is hanging down from
the ceiling (which is so high up you can't see it). All but the
bottom 1 WU of the box is left untextured, so you can effectively
see through it. To get the engine to draw the walls behind the
box (which would be wasted effort under normal circumstances),
some care with the room geometry is needed. Basically, the wall
has to be visible via normal means to at least one side of the
portion behind the box. By violating this rule, it's possible
to ruin the effect. Try moving to a position such that the left
edge of the cube is slightly off the left edge of the screen,
and the right edge of the cube is just to the right of a corner
of the room. If you then look up, you'll see smearing above the
cube, where the left wall should be: the engine "knows"
that the left wall doesn't need to be drawn any higher than the
bottom of the cube. If you move your point of view even slightly,
so that the left wall is visible to the left or right of the
cube, the portion behind the box will also appear. The basic
idea is to make the background walls as wide as possible relative
to the floating object, so that the object will only rarely cover
the entire width of a wall. Some other limitations of the technique
that will become apparent as you play with it:
- Since the area above the cube is actually solid, you can't
put a creature or object up there, and you can't fire weapons
over the cube.
- You can't view the object from both above and below. If you
use the jump key in Forge, you'll see that the cube not only
lacks a top, it lacks a far side when viewed from above. Of course,
you could design the object so that you could look down on it,
but then you couldn't view it from below. The "two nearly
identical copies of the room" trick from Missed Island would
be useful for working around this limitation.
- Any one polygon has exactly one ceiling and one floor: that's
simply how the engine works. At the center point of the room
in this map, the ceiling is actually the bottom of the cube:
there is not and cannot be a ceiling directly above the cube.
If you jump high enough to see the place where that ceiling should
be, you'll find only a smear. This means that the technique requires
a ceiling so high you can't see it (or a floor so low you can't
see it, if you are making a floating object to be viewed from
above). You'll almost certainly use a ceiling height of 9 WU
(or a floor height of -9 WU) around a floating object. The walls
can either be textured all the way up (giving the appearance
of a courtyard between very tall buildings), or (as this map
shows) they can switch to the landscape texture at some intermediate
height.
Bridge Test
This was my original test map for the untextured wall effect.
It smears from too many points of view to be really useful, but
it certainly looks nice in the cases where it does work properly.
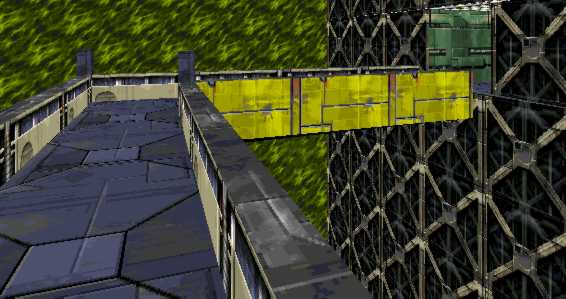
Floating Bridge
(Editor's Note: See graphic above) This is an updated bridge
based on my experience with the previous two maps. This time,
the floating object is viewed from above, with a floor so low
you can't see it. It still smears a lot, but is a lot closer
to being usable than the previous map. Some points illustrated
by this map:
- Note that the ends of the bridge do not quite touch the walls:
this is needed so that there can be a complete horizontal extent
of the wall below the level of the bridge. The gap can be made
invisibly small by turning off 'constrain to grid', however I
left it as is so you can more easily see how the bridge was constructed.
- Note that each of the two corridors has a threshhold that
flares out to the full width of the wall: this allows the wall
below the corridor entrance to consist of a single horizontal
extent, rather than three pieces as would be the case if the
corridor connected directly to the wall. This should reduce smearing,
as it increases the chance that some part of the wall is directly
visible. Again, this threshhold could be reduced to a nearly
invisible width, but was left as is for illustrative purposes.
- The two posts at the bend in the bridge were originally unfilled
polygons (negative space) connected to the roof, giving the appearance
of support cables. Unfortunately, the smearing was a lot worse
that way. The benefit of using negative space in a normal map
is that the engine can independently draw the surfaces to either
side of the poly: the complexity that the engine has to deal
with becomes the maximum of the left and right side, rather than
the sum. However, the untextured wall trick relies on inefficiencies
in the engine: anything which lets it more accurately calculate
which surfaces truly need to be drawn is counterproductive. The
support cable look could be restored by setting the floor height
of those two polys to about 0.01 WU less than their ceiling height:
the small gap would not be noticeable.
Stepping Stones
Yet another floating bridge, this time made from individual pieces
rather than a continuous span. The idea is that you'd generally
be able to see the far wall between the pieces, and therefore
the engine would be more likely to draw the wall above and below
the pieces. There is still some smearing, but this could be reduced
by using smaller pieces (although that would make it easier to
fall off).
- It is quite easy to fall off the bridge in this map, and
the view on the way down is NOT pretty. I tried to fix this by
enclosing the proper path in solid lines, with little effect.
This is actually a Forge bug, unrelated to the untextured wall
technique: it doesn't allow you to specify which side of the
line you're trying to make solid, and its guess is only appropriate
in simple situations such as making an unpassable window.
- If you do fall off, just walk to the middle of one of the
bridge pieces, and you'll magically be lifted back up to the
path. This is an interesting side-effect of untextured walls:
they don't block movement of nearby players, and therefore can
be stepped into regardless of the normal maximum step height.
If a completely transparent texture was used instead, you'd be
stuck down there.
- The bridge pieces could be given some thickness, at the cost
of a lot of extra points and lines (basically, each becomes a
copy of the floating cube in the first map): that's how I originally
designed this map, but ran into the transparent sides limitation
and decided that using flat pieces would be easier than redesigning
the level to use fewer pieces.
Ledges
This map demonstrates a couple of other possible uses of this
technique: an awning over a doorway, and a big zig-zag object.
They can smear from certain points of view, but if used in a
map where the player could only see them from a certain direction,
I think they could be made foolproof.
- As usual, the floating objects (the awning, and the center
block of the zig-zag) are not actually touching the neighboring
objects. The gaps have been made fairly small, and could be made
smaller still by moving the points while the map is zoomed in
as far as possible.
- If you back into one of the corners by the zig-zag and look
up as far as you can, you can see the smear directly above the
awning. Basically, this level needs to be narrower or taller,
and since the ceiling height is already 9 WU, taller would imply
making the ground level negative.
Conclusion
If you have any questions or comments about the technique presented
here, or if you use it in a map, feel free to contact me at:
JasonHarper@pobox.com |