
|
|||
|
| Stacked Windows |
|
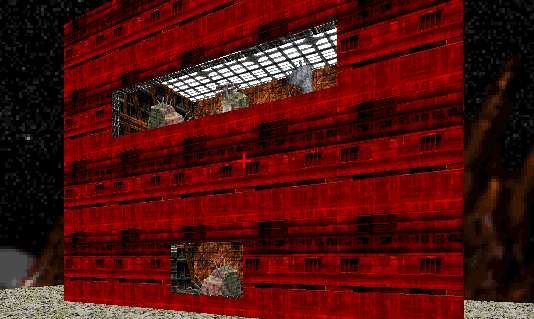
Stacked Windows This is a further experiment with the techniques shown in my Untextured Walls maps, producing an effect generally considered to be impossible in a Marathon map: a building with a window located directly above another window. You can view this map in either Infinity or Forge: I'd suggest the latter, since you can jump to see the effect from different angles. The explanation that follows builds upon [my] Untextured Walls maps, and won't make much sense if you haven't read that already. You should be able to find that file wherever you found this one. The basic trick here is that there is actually only one window in the building, in the shape of a 'T'. There is a some floating geometry in the middle of the 'T', visually breaking it up into the long window across the top and the smaller window at the bottom. This geometry hangs down from the top: the center of the top window is actually solid, but has been left untextured so that anything the Marathon engine draws behind it is left visible. Setting this up is complicated by the fact that the untextured wall trick can't produce a ceiling over a floating object that is hanging down from the ceiling: using a single floating object, the same thickness as the walls to either side, would result in the top window having its top frame missing in the center. To work around this, I actually used two extremely thin floating objects, one producing the outside wall and one producing the inside. This results in two holes in the top window frame, however they are only about a pixel wide in most views and are therefore hardly noticeable (and could be made even less noticeable by using more similar textures for the window frame and the ceiling, which is what usually shows through the holes in the frame). The fundamental rule for avoiding smearing when using this trick is to make the geometrical elements behind the untextured walls as wide as possible. In this map, the room behind the windows must be composed of a single polygon: if it was split up, there would be lots of cases where there was no true line of sight into one of the sub-polygons, causing the engine to not bother drawing it even though we want it to. Since there are actually 10 points on the boundary of the room (4 corners, 2 for the edges of the door, and 4 for the window), I had to fudge this a bit. There is very thin, trapezoidal polygon on the wall with the door, so that the rest of the room could be filled with a single 8-point poly: if the trapezoid smears, nobody will notice since it has almost no area. Likewise, the far side of the room should consist of a single wall, so that some part of it is truly visible no matter what the angle of view is. It really wasn't a good idea to have the room narrow enough that the side walls could be seen through the window: if the room was made sufficiently wide (or the player's position sufficiently restricted) so that the side walls could never be seen, much of the potential smearing in this map would be eliminated. Another, less obvious consideration is that the polygon between the floating objects (forming the center of the top frame of the top window, and the bottom frame of the bottom window) must extend to both sides of the objects, so that there is always a true line of sight that goes through that poly (the basic requirement for the engine to consider drawing it). This consideration is what led to the 'T' shape of the windows: an 'L' shape, where the window frame poly extends to one side only, would result in smearing when that side of the window isn't in the player's view. A zig-zag shape (resulting in two staggered windows) would have worked nearly as well as the 'T'. To help you understand how this trick was done, the map contains a second copy of the building with the following changes:
Any questions or comments you might have can be sent to [my email address above]. |
| Download Jason Harper's example map and tutorial. |
![]()
![]()