| Gary L. Simmons | rev 12/04/03 | http://webwonks.org/Marathon/Forge/Chrisk/Arches.html |
| Litterbox | Forge Tips | Chris Komarnicki Tutorials |

Forge Tips | Chris K Tutorials | Contrails | Moving Vehicles | Sliding Doors | Swinging Doors | Smashing Windows | Exploding Walls | Spaceship Landing | Flashlights | Laser Scope | Unique Terminals | Arches
 |
| Arches |
|
This section is about the creation of the arches. I've had a few emails from people wanting to know how to create them, so I've thrown it in to the tutorial. Now that you've seen them (well, there's a bunch throughout the tutorial...), I'll tell ya how to make 'em. First Rule: they have to be 1 WU x 1 WU. Since they use transparent wall textures, anything else won't work. Transparent wall textures get flipped around depending on which side of them you're standing on if they aren't 1 WU x 1 WU. Second Rule: This applies to all uses of transparent wall textures (I refer also to the smashing windows effect, where one is placed in the window to make it look blown out - I shoulda probably mentioned that in the windows tutorial...). The ability for a shot to pass through a transparent wall texture depends on two things:
Here's what I'm getting at - these arches will block your shots, so don't place 'em where there's gonna be a lot of fighting. Ooo, don't stand too close if you lob a grenade, either... also, implementing these arches might screw up your physics settings for other transparent wall texture uses you have in your map. This effect requires 4 textures:
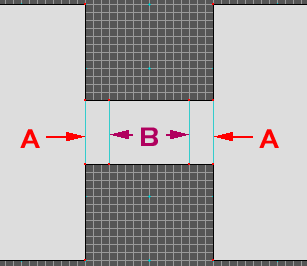
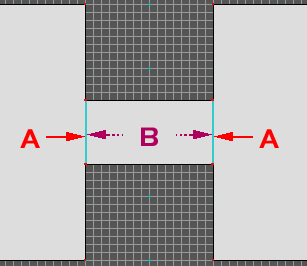
The shading of the textures themselves is crucial for the effect. Flashes from weapons or just plain walking through the archway will reduce the shading. The shading hides the texture's seams, allowing the archway to look rounded. In the last arch you walked through, [Editor's Note: In the tutorial map's terminal you were instructed to look at a nearby poorly constructed archway- gls 01/14/2001] I purposely textured it all wonky-like. You can easily see where the polygon edges are, and where the transparent textures are placed. The white "light" texture shows the part of the arch that will get collapsed to the outer edge, and will be only 1-pixel wide, almost unseen. When constructing your arch, remember to texture these areas before collapsing them, because it's extremely hard to do afterwards.  Here's what the uncollapsed arch looks like in Forge. A. Transparent arch texture 
When a player walks through, the illusion of a rounded arch ceiling is complete. Too easy, really. The only drawbacks are the white polygon edges seen between the textures (and the fact that you can't always shoot through 'em, of course). I couldn't find a way to eliminate these visible edges. |
Forge Tips | Chris K Tutorials | Contrails | Moving Vehicles
| Sliding Doors
| Swinging Doors
| Smashing Windows
| Exploding Walls
| Spaceship Landing
| Flashlights | Laser Scope | Unique Terminals | Arches