|
|||
|
 |
| Smashing Windows |
|
There's one BIG problem with this effect if you plan to only temporarily sacrifice an alien (how to do this will be covered in the next terminal): the sounds. To perfect this effect requires changing an alien's death scream to the same sound as smashing glass, which is permanent in the Sound file. You'll also need to either remove or reduce the volume of the crushing sound (or, change it to the same sound as the smashing glass). [I've added a small Sounds file patcher that does just this. I plan to get a non-Bungie smashing glass sound eventually, when I get around to altering my Sounds file, but for now, I merely lowered the volume of the crushing noise and copied the "lamp breaking" sound into another sound slot. You could also change the sound in the Shapes file, under the alien's sequence section. I chose to do it this way, as a preamble to the addition of new sounds. Well, also to lower the sound of the platform crunch...] Without these 2 major modifications in the Sounds file, the whole effect is a bit silly, because it ...sounds awful. This effect is somewhat complicated. We'll start by creating the rooms and windows in Forge. Then, I'll explain the required textures and new alien to create the effect. After that, I'll show you a slow-moving version, so you can see how the effect works.
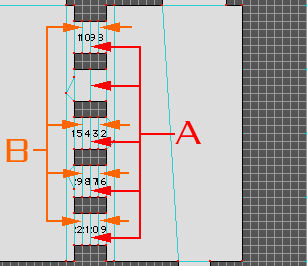
A - These polys are set at .5 floor height, and 1.5 ceiling height.
Please note that having too many smashing windows in one room will cause the "smearing" problem, as with past effects in this tutorial. This happens most consistently when there are windows facing each other on opposite sides of a room. It can also cause Marathon to lose track of which window the player is passing through, making the player skip from one window to another. C - To sidestep these problems
on this map, I removed one of the smashing windows. They extend from floor to ceiling, from the ceiling. They cannot be activated by the player! Also, under "Miscellaneous", set the "Can't
Deactivate Externally" and Secret" tags on.
These platforms are similar to the "kill" platforms
from the first tutorial on the moving shuttle, except that the
dying alien is seen (that death sequence is the smashing glass
seen when the windows are shot).
1. You'll need a new "Switches" texture. For this wall texture set, I've got it split in two: one for the smashing windows; one for the exploding walls (the next tutorial...). [I've also got another wall collection where the switches texture is split in half and shared with a series of regular switches.] 2. You'll also need a transparent
wall texture of the window once it's been smashed, for added
effect.  A
-Place the transparent texture in the middle of the window, on
the polygon edge between the two inner platforms. A
-Place the transparent texture in the middle of the window, on
the polygon edge between the two inner platforms.
B - Place the Switch texture on the outer faces of the platforms themselves (remember to texture BOTH sides of the window, so they can be destroyed from both sides). Make these switches platform switches that activate the platform they happen to be placed on. Ensure that they are only toggled by weapons. I'll stick in a sidenote here: Which weapons you choose to have "toggle" the switches (i.e. - shoot through the windows) is set in the Physics model. In the next lesson, we will be covering exploding walls, which are very similar to smashing windows. The point here is that you can't realistically put both effects on the same level, since you'll be able to blow up a wall with a bullet or fist punch...
1. All towards the inside of the room (this is the way I did it on this example); 2. All towards the outside wall; or 3. All towards the middle of the window. This is done to make the windows very thin (1 to 5 pixels) so the transparent texture looks as though it was exactly where the switch texture was. Otherwise, there's a noticeable "jump" in the wall textures.
Let's get into the creation of the alien that acts as the smashing glass. You can use any alien for this effect without permanently sacrificing that alien. You will, however, have to create 2 new sequences, though it doesn't matter which collection in the shapes file you put them in. So, you've found a nice little place in a shapes collection to plug in your new sequences. First, with "Expert Mode", add some new bitmaps. I used 6: one for the alien's invisible sprites, and 5 for his death sequence. Paste a small blue square in the first new bitmap (one that is 100% blue - invisible in gameplay). Then, paste a series of smashing glass sprites in the rest of them. Here I used some sprites from the "Explosions Effects" collection, but desaturated them, so they look like glass, rather than exploding flames. It's a time-saver. Now, in the sequences, add 2 new ones. The first will contain only the invisible sprite, the second will contain the smashing glass sprites. Close the Shapes file and open the Physics file. Choose the alien you want to sacrifice, and under "Appearance and Sounds: Appearance", set the 2 integers so that the graphic collection and colour table are the same as the new sprites you created. Then, under "Sequence IDs", set all the numbers to the number of the first new sequence you created EXCEPT for the hard and soft dying. Here is where you put the second new sequence number. When you put that alien in a map, using this new Physics model, it'll be completely invisible, except when it dies, at which point you'll see smashing glass. We're almost done with the new alien. Still under "Appearance and Sounds", ensure that all of the "Sounds" are set to "None". Under "Easy Edit": Vitality = 1; Speed = 0; Attack Types = None for both; Attack Frequency = 0; Carrying Item Type = None. Under "Combat Settings", everything should be either
0 or None, except for the "Shrapnel" integers. You
can put whatever you want here. It allows the player to sustain
damage if he's too close to the glass when it shatters. Under "Behaviour Settings", only 2 boxes should be checked: "Cannot Skip", and "Cannot Attack". You should also ensure that none of the other aliens have this alien tagged as an enemy in this section. Well, unless you've got some crazy idea of making the other aliens on the map shoot out the windows. Under "Immunities and Weaknesses", all immunities should be checked except for Crushing. Likewise, none of the Weaknesses should be checked except for Crushing. You now have an invisible alien that emulates smashing glass when the windows are shot. As yet another sidenote, I'd like to point out that I tried many ways to get this effect to work, but none functioned properly without the creation of the alien and new switches texture - some sacrificing was essential to properly implement this effect. Let's go take a look at a slow-moving version of the smashing windows effect... [Editor's Note: the terminal you are reading teleports you to a level with an alternate construction technique - gls 11/14/2000] This map was taken from an older tutorial I'd made, so the window platforms and switches use a tag-based triggering system. I replaced it with the "Activates Adjacent Platform" on activation tag. I find this to be a better idea, since it doesn't eat up all your tags. Remember that there's a maximum of 15 tags per level. Well, that wraps it up for exploding windows. To reiterate:
|