|
|||
|
|
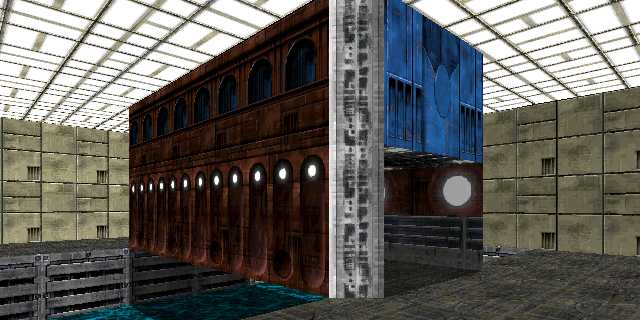
Split Poly Bridges
|
|
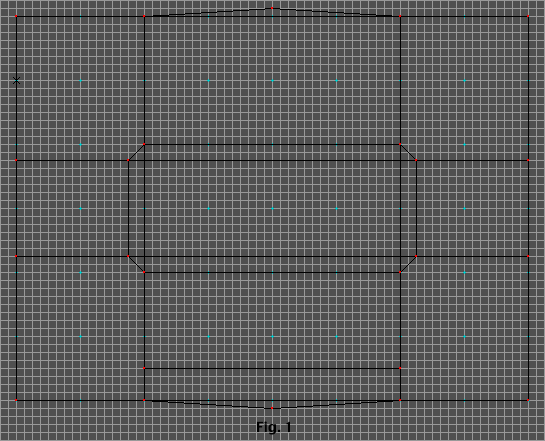
| 1) Draw the wire frame of your bridge and its encompassing room. Put a return elevator in the bottom of the trough the bridge spans. I did this at the bottom of the map. Also you might as well put a couple polys on the ends of the trough. These can be normal split polys as there will only be one split poly and it will be on a negative space wall. Refer to Figure 1. |
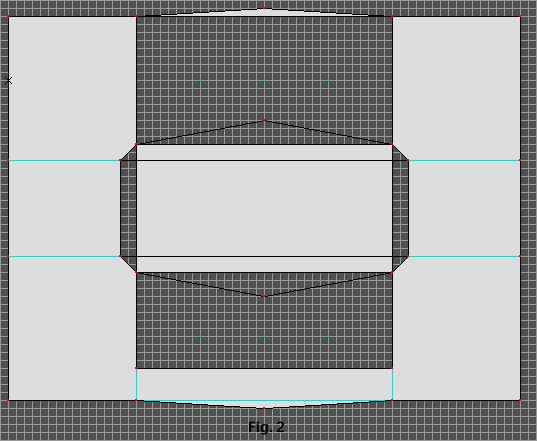
| 2) Fill the polys as shown in Figure 2 and create
2 Battle Cat's Split Polys one on each side of the outside surface
of the bridge. 3) Fill the split polys. Give the two split polys a floor height of -1.0 and a ceiling height of 1.0. Now you have to stop and think out what your plan is going to be. Are you going to have media under this bridge? If so, what are the parameters of the light you are going to use for the tide? What light are you going to apply to the liquid? At this point in your map development, you should already have these things decided. If not, you will have to tear down your work and add it in later. Your trough under the bridge will have a height of -1 world units by the way. So, create a light for the tide of your media, create a media, apply the media to the split poly and apply a lighting value to the liquid. Hey. Did the reservoir tip of your condom just inflate? THAT WAS BECAUSE YOU FORGOT STEPS 1A THROUGH 1E YOU IDIOT!!! |
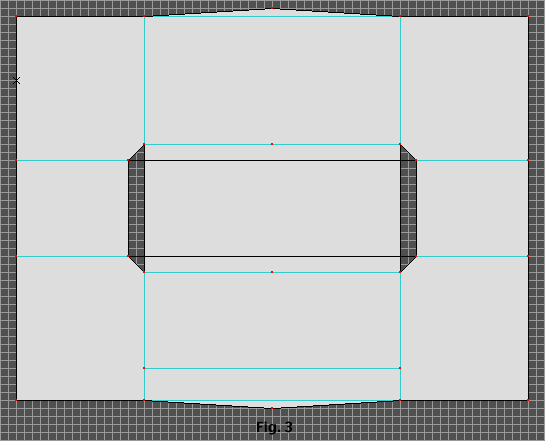
| 4) Close your Battle Cat's Split Polys as shown in Figure 3. Fill the trench polys now, those two that are adjacent to the bridge split polys. |
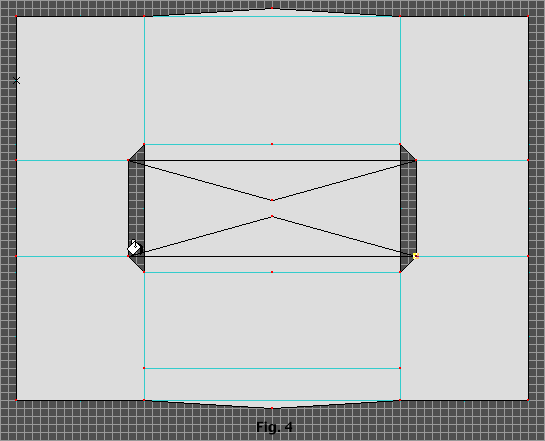
| 5) Draw the special split polys that are to go on the inside wall of the bridge according to Figure 4. Fill them now, note you can fill them from the little part of them that is visible, Figure 4 demonstrates where with the fill tool. Give them a floor height of zero and a ceiling height of 0.5. Do you hear the sound of rubber stretching? YOU FORGOT STEPS 1A THROUGH 1E AGAIN!! |
|
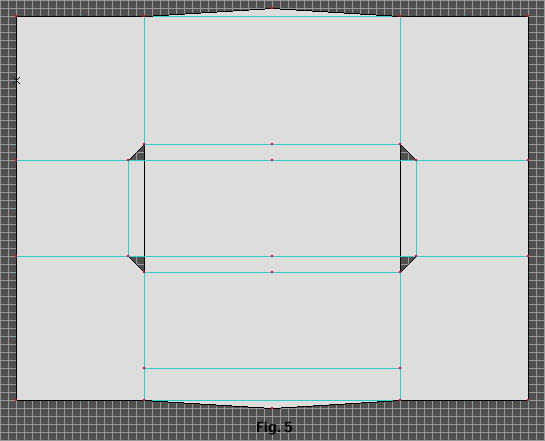
6) Close these split polys as shown in Figure 5 and fill the poly comprising the floor of the bridge. You will notice that when you close these polys the base line of the triangles disappears! Not to worry, in this case Forge is still keeping track of them. 7) Put media, if used, in the trough and under the bridge. Set the floor height of the trough to -1.0 and the ceiling height of every thing except the inside of the bridge to 2.0. The inside of the bridge gets a floor height of zero and a ceiling height of 1. The poly under the bridge gets set to a floor height of -1.0 and a ceiling height of zero. The floor height of the bridges perpendicular walkways is zero. The split poly on the very top and bottom of the map each get a floor and ceiling height of zero. HEY! An old fashioned split poly, how quaint! Soon those are going to be worth money as they become classics and collectors start buying them. 8) Place a player object in the map, pave it and save it. Go in and texture your map, then afterwards make the rectangle poly at the bottom end of the trough a platform that will lift you out of the trough. You do that last so the split poly texture does not "spin" when the adjacent platform is activated. But you knew that and I'm only being bossy. |
| You can download an example map (4K) from this tutorial to put on your dissecting board. I know it's not real vivisection, but if you sit on your little brother's head while you pull the guts out of this example map the shrieks and whimpers will mimic one and be just as satisfying. |