|
|||
|
|
Ledges and Low Walls
|
|
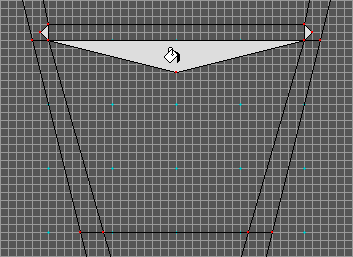
 Figure 1 |
| 1) Create a "wire frame" room that contains a low wall. By wire frame I mean just draw the lines for it. I included the lines that I will use for lights and shadows using the doorway at the bottom of the map as a light source. See Figure 1. You don't need to go that far for this exercise, but after all I am just stealing this from an old map I already did. |
|
|
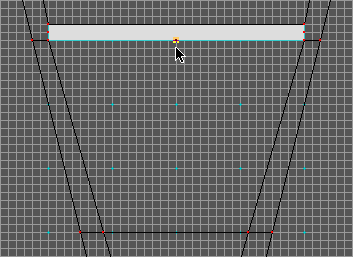
| 2) As shown in Figure 2, draw your split polys
and fill them. 3) Set your floor height to be 0.67 and your ceiling height to be 2. Remember to follow the steps 1a through 1e in the General Instructions or I will send one of my Enforcer friends over to your place for an old fashion weenie roast. Always remember, do as I say, not as I do. 4) Fill the low wall poly next or you will not be able to fill it later. I don't know why, Forge just gets confused as to what the hell you are doing because, face it, you really are "bitch slapping" Forge around by doing this sort of thing to it. |
|
| 5) Close your special split polys as shown in
Figure 3. 6) Fill the other polys in the room next. Give the wall a floor height of 1 world unit and a ceiling height of 2. Give the door way and door overhang a floor height of zero and a ceiling height of 1. For the rest of the map, give it a floor height of zero and a ceiling height of 2 7) Add a player object, pave and save, then go into your map and texture. |
| You can download an example map (4K) to pick apart like that poor disemboweled calculator that is still lying in a jumble in your desk drawer. You can use these same techniques to animate any portion of a single wall texture. There are a number of textures in the Jjaro set that cry out for animation. Just carefully place your special split polys at the appropriate heights making sure the vertices are properly placed then use Forges texture mode drop box to designate the split poly as a moving portion of that texture. You can get some really cool effects. |
![]()
![]()