Gary L. Simmons  rev 10/09/03  http://battlecatslitterbox.com/Forge/tBC/Platforms.html
Litterbox Forge tips  Battle Cat's Split Poly Technology

The Battle Cat's Litterbox


Forge Tips | Split Polys | Light Walls | Ladders | Windows | Ledges | Bridges | Platforms | Shadows | Switches

Split polys on platforms and doors!

Platforms and Doors


There are a number of uses for the Battle Cat's Split Polys with platforms. These split polys fit quite handily on the sides of a platform, be it a door or an elevator. If your custom texture set has a set of 4 textures comprising one logo or some other such thing, you can now put this on a working door. You can create sections of wall that are composed of perfectly flat platform polys. Why you ask? Geez, I don't know. It would look cool though and be   another step closer to animated textures. Another use for split polys and platforms is to put them over a door that is on a wall higher than one world unit. That way you would not see the entire wall texture lifting as the door opened. How about making a shadow that goes up or down a wall from a platform in front of a light source? No problem. Read the tutorial on platforms and be enlightened.


First off just to give you a taste of what is going on here open Forge and create a new level.


Figure 1


1) Draw a room like in Figure 1 by putting two rectangles together and put a triangle split poly on one side.
2) Fill all the polys. They will have a default floor height of zero and a ceiling height of 1. Leave them like that. 3) Use your arrow tool to select the triangle split poly and make the polygon type a platform. Click the Platform Parameters button and make a few small changes. Uncheck the AutoCalc min max platform heights and make the minimum height 0 and the maximum height 1. Change the platform speed to 1.134. Click OK.
4) Go back into draw mode and close the split poly by dragging the apex to the center of the base line.
5) Draw another split poly in the exact spot the last one was in and fill it.
6) Repeat steps 3 and 4 with only one difference, don't change the speed of this new platform. You may want to double click the base line of the split poly and make it a solid line if you get a bouncy poly.
7) Place a player object into your map, pave and save.
8) Go into visual mode and texture the platform wall with 3 different textures, one for the back wall, a second texture for the slow platform and a third for the fast platform. Now just sit there and stare at what you have done. Take a minute, I'll wait right here.

Did you get up close and look at it from the sides? That was pretty neat eh? A completely 2 dimensional wall with two 3 dimensional moving objects trapped in it. You don't have to stop at 2 platforms, you can put quite a few in but remember if this is a fighting map you are going to be sacrificing engine speed and playability as well as sucking up memory like Oprah sucking the butter out of a turkey baster. You know, you can ride that flat elevator if you walk into it and continue to press into it. Not very far in this map though. Try it in another map, one with a higher ceiling, put a moving platform in the foreground and an unmoving raised platform behind it (to stop the bouncies). Does this give you any ideas for a puzzle? Eye candy? Go back into visual mode in the first map and give the platforms a texture mode of fast horizontal slide. If you make an ocean wave shaped texture and put it on a couple of low platforms that alternate exactly, you can mimic waves, maybe put a landscape texture behind it. Surfs up.


Figure 2


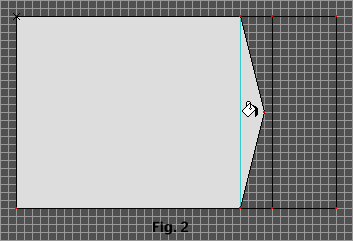
Platforms no longer have to be all one texture. You can put a split poly on the side of a platform. It's easy, here is how:

1) Use your line tool to draw a room like the one in Figure 2. The triangle poly is split poly.
2) Leave the floor heights of both polys the default height, make the ceiling height of both polys 2 world units.
3) Select the split poly by clicking on it with your arrow tool and make the polygon type a platform. Click on the Platform Parameters button and make only one change to the default platform settings. Uncheck the AutoCalc check boxes for Min and Max heights and set the minimum height to -0.5 and the maximum height to .5. Click OK.
4) Close your poly by dragging the apex to the center of the base line of the split poly.
5) Fill the poly next to the split poly next. Make sure it has a floor height of zero and a ceiling height of 2.
6) Select this poly by clicking on it with the arrow tool and set it's polygon type to be a platform. You do not need to set any platform parameters.
7) Fill the last polygon and give it a floor height of 1 and a ceiling height of 2.
8) Put a player object into the map, pave and save.
9) Go into visual mode and texture your map.

Note that you will be able to put a double texture on the side of the platform, one that moves with the platform. You are not limited to one split poly on a platform, just by your imagination and will power to sit and experiment. The key to this trick is that the split poly is partially "underground" This is the same trick you would use to put a 4 texture logo on a door as I was barking about earlier. Make the platform a door 2 world units high. Put a split poly on it. The vertex in the apex of the split poly will break the door into two textures horizontally and the split poly will break the door texture into 2 vertically. You need just one other vertex in the center of the line composing the face of the normal platform. This will work whether the door goes down into the floor or up into the ceiling. Bingo, now you have that giant logo of yours going up and down on a door. Cool?


Figure 3


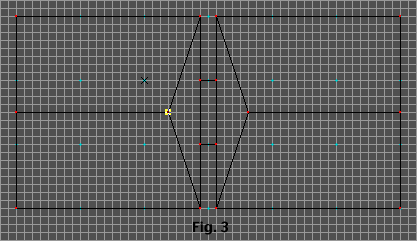
Have you ever had the need for a door in a room with a high ceiling but putting a cornice directly over the door is not right for your door? The Battle Cat's Split Poly Technology™ gives you that option.

1) Use your line tool to draw two rooms connected by a doorway as shown in Figure 3.
2) Fill all the polys at this time.


Figure 4


3) Close the split polys as shown in Figure 4.
4) Use your arrow tool to select the door poly and make its polygon type a platform. Go into the Platform Parameters and make the platform a S'pht door.
5) Place a player object into the map, pave and save.
6) Go into visual mode and texture your map. Even though you have split polys on the wall over the door you do not need to texture them differently. It might be more dramatic to have it all look like it is a solid wall. It might not. What is important is that you now have more control over how your map will look.

Now some smarty pants will ask you, "Hey dooood, where is the door going maaaan?". Just look at them like they are from the sticks and say, "Molecular compression portal technology doooooood!" I have provided an example map (2K) of the example in Figure 4. Careful now, this map is like James Bonds briefcase in "From Russia With Love", if you don't open it exactly right you get a face full of tear gas. I couldn't find any actual military CS for the gas canister, I just had to supply some of my own "home grown" gas. Maybe now you can see what my wife is up against.


Forge Tips | Split Polys | Light Walls | Ladders | Windows | Ledges | Bridges | Platforms | Shadows | Switches

Top of page

Back to the Litterbox