|
|||
|
|
Split Poly Shadows |
|
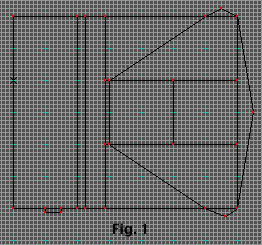 |
| 1) Use your line tool to draw a room as shown in Figure 1. Fill the polys and set the ceiling height to 2 world units. |
|
|
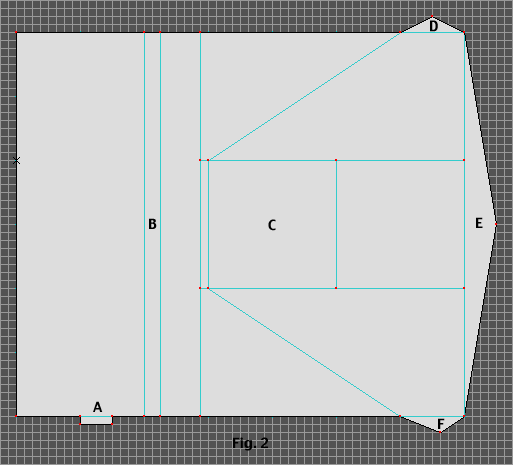
| 2) Figure 2 charts different portions of the
map. Part A, the rectangle poly at the bottom right of the map
is a switch alcove, give it a ceiling height of 0.8 and a floor
height of 0.3. Part B is a low wall. Give it a floor height of
0.334, just high enough to be impassible for this demo. If this
were a real level I would make a line in the wall solid so as
to keep trespassers on the right side of the law. Remember, because
of the limitations of our texture set, the player cannot get
too close to the shadow. Part C is a large square platform, one
that will block the light and project the shadow. Parts D, E
and F will be split polys that will also be platforms, however
they will eventually be flat against the wall and will act as
the shadows. 3) Put a player object into the map, pave and save. Go into your map and give your walls a texture. Set the light on every wall to zero. Set the light on the floor polys of the platforms D, E and F to 20. Give them the same texture as the walls. |
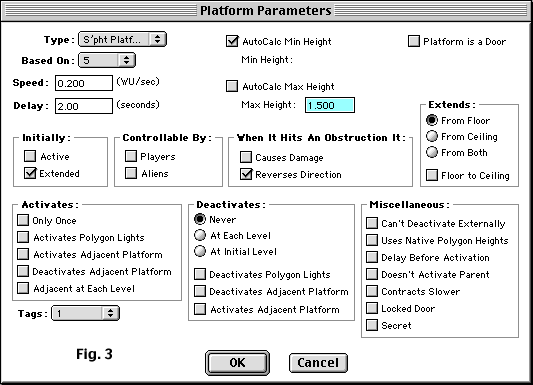
| 4) Use your arrow tool to select the large square
poly under part C. Make its Polygon Type a platform. Click on
the Platform Parameters and use Figure 3 to as a guideline to
set your parameters EXACTLY the same. Make sure the platform
is noisy, make it a "S'pht Platform". 5) Repeat step 4 for parts D, E and F with the only change being that their platform type is "S'pht Platform Silent" , unless of course the shadows in your part of the town are noisy. 6) Close your split polys D, E and F by dragging their apex vertex to the center of their baseline. Remember, you should be observing steps 1a through 1e before you close them. You don't want me sendin' mah homies to rain on yo melon... and mosta mah homies be Vulcans. |
|
|
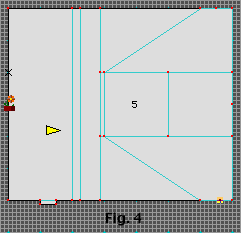
| 7) Put a light object as shown in Figure 4, set
it so that it is -0.5 from the ceiling, that will match the height
of the platform and explain the height of the shadows that will
be on the far walls. 8) Go into visual mode and texture the sides of the raised platforms D, E and F. Use the same texture you used for the walls only give it a light of 20. See where we are going here? Texture the sides of raised platform C, taking into account only the side facing the light object will have a light of zero, the remaining sides should be set to 20 or whatever you think is appropriate. Give the ceiling and floor a bright light, say 6, except on the floor behind the low wall. Make that portion dark. 9) Remember that switch in the wall? Let's install it while we are in visual mode. Make it a tag switch with a tag of 1 and set it so that it "can be destroyed". |
 |
| 10) Next we need to create a new light for the
floor, when platform C is all the way down the floor should be
completely light, when the platform is raised the platforms shadow
should be on the ground. Refer to the light parameters of Figure
5 to set the new light. 11) Look at Figure 4 again, see those two diagonal lines coming off of the edge of platform C? Those are shadow lines. Set the light of the floor textures behind the shadow lines to the new light. |
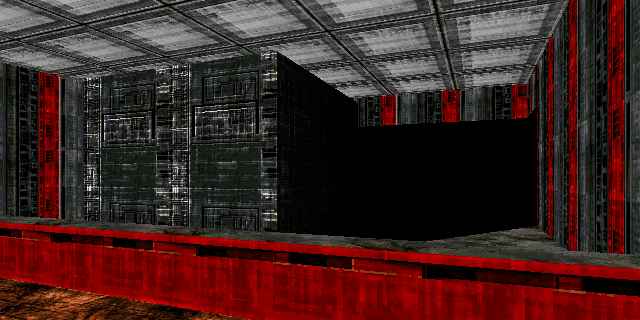
| That's it. Go push the button. If you managed to do everything I told you and I managed to tell you with out screwing it up, you should see the platform casting a shadow on the back wall. When you push the button platform C lowers and you can see the shadow in the back lowering with it. When it reaches the floor the shadow is entirely gone until the platform lifts up again. This is MUCH more effective if you have a featureless texture in your custom texture set, as I said a player can walk right up to it and it is just a flat shadow on the wall sliding up and down. A very cool effect. So this is the basics of the platform shadow using the Battle Cat's Split Polys, there are of course, infinite variations of it. This demo does not have the exact ratios of shadow speed to platform speed because it does not take into account the effect of parallax. Nor does the floor shadow appear and disappear super realistically, but they can. YOU go put that extra effort into it. Go explore, have fun. Amaze us all with your clever inventiveness. You can download an example map (4K) Print it out, tie it to a string and amuse your cat. Shred it into a bowl and sprinkle raisins on it, it stays crunchy even in milk. |
![]()
![]()