
|
|||
|
|
|
General Instructions |
|
Remember when you create one of these special polys, make
sure you completely finish each poly before you close it and
move onto the next. This is important because once you have "closed"
the second one of these split polys it is permanent, there is
no opening it up to work on it again. By "completely finishing"
it, you should use your View menu to: Why all these extra steps? Because, although these are one dimensional polys extruded into two dimensions, in some cases the lights and textures tend to "bleed" out where one elevation meets another. The monster impassible polygon type is set because if the floor elevations are right, your monsters will be crawling up your walls like cockroaches. Worse yet is if you have monsters generating randomly, they will be spawning inside closed split polys, trapped like rats and squawking like demented chickens. Same goes for randomly generating ammo and weapons only without the pathos. When you create sets of stacked split polys there are two
ways to change ceiling or floor heights. Create an area with
negative space, draw your split polys into the negative space
and keeping the floor height the same, change the ceiling height
of each split poly proceeding from the upper ceiling height to
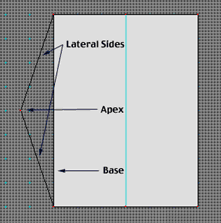
the lower When creating a line to be the base of your split polys, make sure it is directly on a grid line or a 45 degree angle of the grid lines. This allows your "Constrain to Grid" setting in your map manager to exactly place the apex of your split poly directly on the base line insuring that you have a one dimensional poly. Otherwise you will not be able to stack polys. If you don't like using the "Constrain to Grid" feature, just bite down on a bullet, constrain to the damn grid for the creation of the split polys and set it back when you are through. Don't try to shoot that bullet now, it will probably blow up in your face. When using a lot of stacked split polys, remember that they take up a lot of memory to render. The more stacked polys in view, the more memory it requires and the slower the game will run. If you have a fast computer with a lot of memory you will not experience problems but there are still a lot of slow machines out there. Be kind. If you have a bone breaking stack of split polys, then let it be eye candy you pass through on the way to a fight. Nothing sucks worse than having a big fight while the engine is bogged down only to crash because of memory constraints. Well, actually, 8 years of Clinton sucks worse. Sometimes when you try to fill a split poly Forge will tell you that it is having trouble filling that poly. Often you can remedy that by simply dragging the apex of the split poly to a new location. In some cases you must break up the split poly differently with some new lines or try it from a different side of the wall. Get your hands dirty. Experiment. Also, Forge sometimes gets confused when you try to fill polys next to a BC Split Poly. If you are doing an example I give you, follow my instructions exactly in the order I give them, then you can avoid that problem. I don't always tell you there will be a problem filling polys in each tutorial, I presume that you have read the general instructions and know to do the steps in order. Sometimes you may experience a freeze when crossing a split poly. This usually happens when you dwell on the exact base line. "Dwelling" can include walking along and over the exact base line. I believe the freeze could be memory related because if you move through it you do not lock up, it is when you linger there. If there is a place where a player would naturally pause on a split poly line, try to gently move him on his way with some flowing media or redesign the problem area. Another cause (I suspect several things are happening here) is the alignment of the split polys apex vertices on the base line. If you move through a narrow passage way where you are forced to walk directly through the exact center of a split poly apex vertex, especially stacked split polys, you can suffer consistent freezing that can be permanently remedied by moving that vertex/vertices off to one side. |
|
The Complex Split Poly |
|
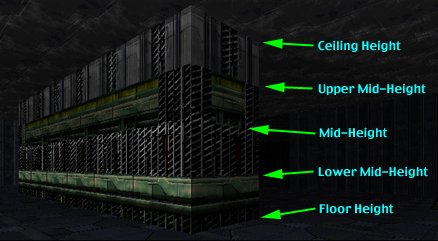
There are 2 special polys needed to create a 4 texture stacked split-poly wall. A triangle poly and a trapezoid poly . Mentally divide your wall into 4 sections. These can be any heights you want so I will only refer to them generically on this chart.
|
 |
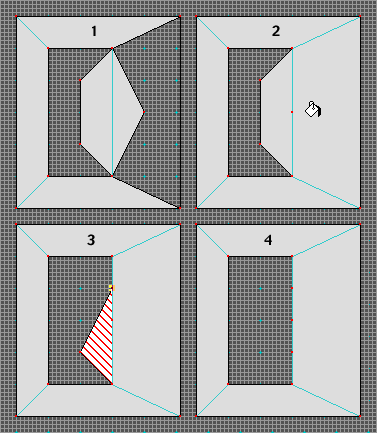 |
Hey that was gruesome wasn't it? You can download an example map (13K) of the complex one and pick at it. Looks a lot worse in print than to actually do it. Make sure you perform steps 1a through 1e as outlined in the General Instructions above before you perform step 13. Print this out and refer to the example map. If it does not work you probably did not follow the steps in the exact order given. I have not had a lot of time to explore this technique, but I believe there is a LOT of potential here for pushing the Marathon engine to the point of internally hemorrhaging. The way Marathon is fooled into thinking there is a fourth texture surface by the juggling of floor and ceiling heights is very interesting and must be pursued. Let me know what you discover, should you decide to explore this technology, and I will add it to these pages. |
|
The Simple Split Poly |
|
![]()
![]()
 ceiling
height. If you are working the other direction, create your same
negative space but this time keep the ceiling height the same
while changing the floor heights from the lowest to the highest
floor. If you do not proceed in this order in each case you will
wind up with only two stacked polys that can be textured. Confusing?
Not really, all will come clear as I give examples of each usage
for the Battle Cat's Split Polys.
ceiling
height. If you are working the other direction, create your same
negative space but this time keep the ceiling height the same
while changing the floor heights from the lowest to the highest
floor. If you do not proceed in this order in each case you will
wind up with only two stacked polys that can be textured. Confusing?
Not really, all will come clear as I give examples of each usage
for the Battle Cat's Split Polys.